Tips to make an efficient and longer lasting SSD.
I’m not going to go into all the details of how a SSD works: There are plenty of articles out there already on that subject. I am also going to make the assumption that you either know a little about SSD’s and some of the other subjects I will be talking about or will at least look it up if you don’t. Also, you can email me if you have any questions that remain unanswered.
There are several things that SSD drives are good at. Fast read/write speeds are usually the main reason most people buy them however. With this in mind the most useful purpose of an SSD is speed; and as such if you are going to use one in your system you may want to consider all the aspects that will make your SSD truly stand apart.
One thing you must consider as a trade-off for all the speed that an SSD offers you it has only so much endurance to write. Without going into a lot of detailed explanation I will just say that every time you write to a SSD drive you take a little of its life away. This is something that a standard hard disk does not do. With this in mind there are some things you can do the both extend the life of your SSD and also take advantage of the speed.
VIRTUAL MEMORY:
SSD’s and virtual memory; There have been numerous articles on whether or not to enable or disable virtual memory and I’m not going to argue either opinion on this. However, when it comes to SSD drives I am an advocate of disabling it on the SSD drive. I would first recommend getting 4gb (or more if you have a 64bit OS) of ram on your system before doing this (if you are paying the money for a SSD this should not be a problem upgrading the memory too). The biggest problem here is that virtual memory is constantly reading and writing to the hard disk. This will force the SSD’s lifespan to shrink dramatically.
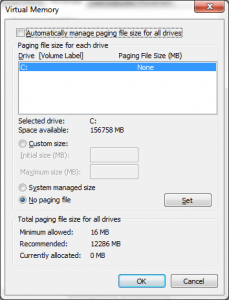
Here is the screen with the virtual memory manager. If you will notice the first check box is now unchecked. This allows us to select the No paging file option. Once you have done this click on Set. Then OK. If you have a secondary Non-SSD disk you can enable a paging file there. You will notice in the example I have forced the minimum and maximum size to be the same. This is an old technique that will cause less resizing on the hard disk and help improve hard disk performance. You will get a warning telling you that you will need to reboot your computer. The changes you made here will not work until you reboot.
INDEXING:
The second area that will cause a slow death is the indexing feature in Windows. The simple way to disable this is to open up your hard disk and under properties uncheck the index box.
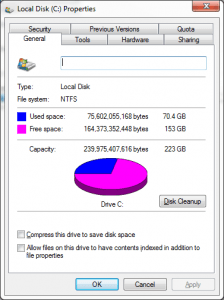
The box you want to “uncheck” here is “Allow files on this drive to have contents indexed in addition to file properties”. Now when you press ok it will ask you if you want to include sub folders as well which you should answer yes to. There will probably be a popup that will say a file cannot be accessed there will be an Ignore and Ignore All choose the ignore all. This will stop indexing on this disk. With the speed of SSD this is really an unnecessary task anyway.
NOTE: If you use the method below you can skip the method above since indexing won’t write to the SSD for indexing.
If you have a secondary Non-SSD hard disk you will want to keep indexing on for that one (also if you move your index database, as shown in the next step, you can keep the indexing on for the SSD). This poses a problem of where the index is stored. The index (which is consistently updated) is stored on the primary drive. It is best to move it to the secondary disk. To do this you will need to open Indexing Options and go to the advanced settings.
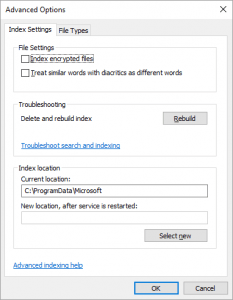
This will open up with current location which should be C:\ProgramData\Microsoft. Below this you can put in a new location like D:\Win\Index (you must create this directory beforehand). Then press Select new. You will need to reboot for this chance to take effect. You can check by opening the Advanced Options again and your directory will be listed under current location.
DE-FRAG:
Another thing to consider is that on a SSD De-fragmentation is not relevant. The whole purpose of doing this was to make all the necessary parts of a file pass under the head of the hard disk is the fastest possible way. With a SSD drive this is not only unnecessary it is just another thing that will kill it over time. Do Not De-frag a SSD drive. It’s a simple rule.
MORE ON DE-FRAG:
Windows 7 says it is smart enough to turn off defrag when it sees a SSD hard disk but in reality, it usually does not. For this reason, you need to open the task scheduler and look for defrag and disable it. This has improved in Windows 8 and more importantly Windows 10. You should not disable this feature if you have a secondary Non-SSD hard disk.
TEMP FILES:
Temp files are constantly being written to the disk by most all of your programs. There is no way around having them, it is a fact of Windows. However, if you use a second Non-SSD hard disk you can move them there. This is not as simple as the other operations so far. We have already covered the Indexing file which is somewhat like a temp file. The example used D:\Win\Index. The D: drive refers to the Non-SSD hard disk and your drive letter may be different but we are using D: in these examples. Also used were two subdirectories the main one being Win with a sub-directory called Index. The reason here is to establish a structure that can be used without cluttering the main drives root directory.
We will create 3 other directories under this directory which will handle the Windows, User, and Internet Temp folders. For this example, we will use WinTemp, UserTemp, and ieTemp. These are created under the Win directory alongside the Index folder.
The Windows and User Temporary files can be moved by modifying a few Environment Variables under System Properties/Advanced. For each on you will need to modify two Variables: TEMP and TMP.
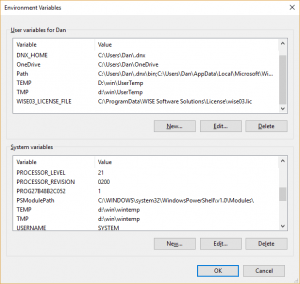
As you can see there’s an User variable and a System variables section and under both sections there are both the TEMP and TMP variables. Edit both of these so they point to the same directory for the section. The next time you reboot Windows will use the new directories.
(You may want to check the system TEMP and TMP variables every once in awhile after Windows Updates since they seem to reset them sometimes)
There is one caveat on moving the Window Temporary directory and that is printing. If the system or user does not have sufficient rights to the temp folder it will cause printer errors when printing. The easy way to solve this is to add Everyone to the directory with full control. There are more secure ways of doing this but that is out of scope for this article.
For the internet you will need to open up Internet Options and go to Settings.
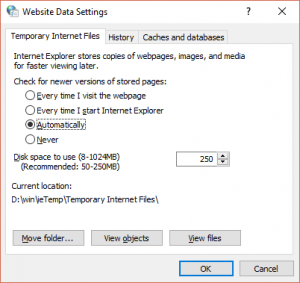
Here you will choose Move folder then browse to folder you made D:\Win\ieTemp. The Temporary Internet Files folder will be automatically created. If you wish you can also put a limit on the Disk space used here. The default is 250mb but setting it to 50mb on systems with faster interconnections is perfectly fine. Once this is done the system will automatically log you off to do the move.
If you use FireFox then you can modify the following:
In the location bar type about:config and enter
Accept the warning message that appears, it will proceede to a list of preferences.
Right-click somewhere in the list and select “New > String”
The preference name will be: browser.cache.disk.parent_directory
And the value put the path to where you want to store the cache.
Next search for browser.cache.disk.enable and set it to true (double-clicking on it to change its value).
If you use Chrome then you will need to change/modify the shortcut:
Right click on the Google Chrome icon and choose properties.
in the target field add the following to the end of the command:
–disk-cache-dir=”D:\win\ChromeCache”
(D:\win\ChromeCache is a sample. You will need to set this to where you want to store the cache).
Promotion:
A good NVME SSD for your new computer would be something from TeamGroup. These are a good and economical drive. TeamGroup has made a good drive for service with a great speed for the price. 500gb is a good size for a boot/program drive. You can do anywhere from 256gb to 2tb on a budget but they go up to 8tb with this model.

